|
|
Digital Capture webOS Mobile Applications My DataBank |
| Home | Features | Advanced | Contact |
|
Features
| |||||||||||||||||||||||||
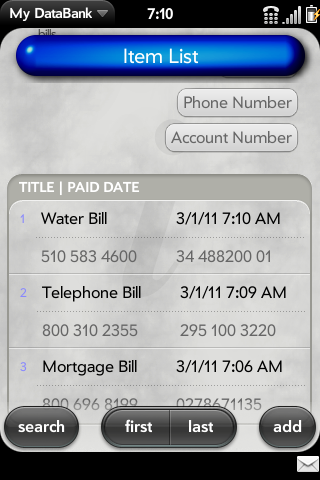
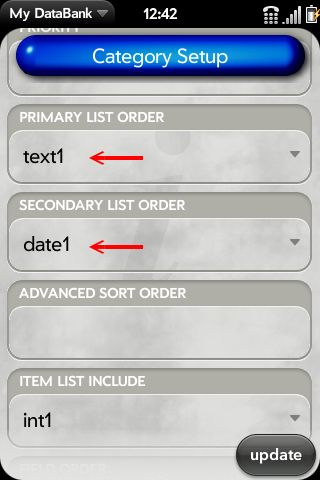
Retrieving stored information in the most efficient and fastest method can be a challenge on mobile applications. My DataBank focuses and provides features that can help with finding your data quickly. The obvious approach is by providing users the ability to create custom categories that help organize and identify where certain information should be stored. Categories can then be sorted by name or priority in ascending/descending order. The Priority field can also be tied to the Frequency Logging function of My DataBank. When Frequency Logging is enabled, it will increase the Priority value for each category you tap from the Category List screen. The Priority value becomes and behaves much like a hit counter which can then be used for sorting. This allows you to keep the most frequently accessed categories at the top of your Category List. Sorting at the Item List level can also be enabled to help ensure that the most significant items you want to view are generally at the top of the Items List. Another option is to begin typing at the Category List or Item List screens. This activates the webOS filtering function allowing you to filter and view categories or items that match your entry as you type. The final tip is to utilize the Field Ordering feature from the Category Setup screen. This allows you to sort the order of fields from the Item Details screen. If you prefer to see certain information immediately without having to scroll further down, you can sort the fields accordingly. | |||||||||||||||||||||||||
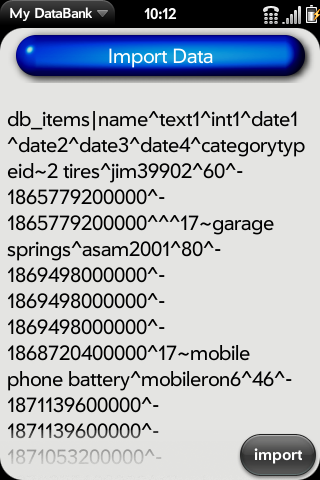
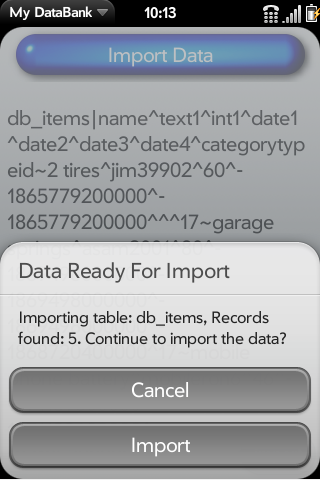
My DataBank relies on it's internal storage to keep your information safe. Whether you are out of WiFi or carrier signal coverage, your information will always be accessible to you. However, it is also important to backup your data periodically in the event of hardware failure. Completely drained batteries, hardware damage, strong magnetic interference, internal water exposure are just a few possible examples that can result in data loss. To Backup your data, go to the Category List screen and tap on the My DataBank button on the top-left and select Export, Backup All Data. This will export your tables (Categories and Items) from the internal database containing your data to your e-Mail application which will allow you to e-mail your information to yourself. In the event of data loss, return to the Category List screen and tap on the My DataBank button on the top-left and select Append Categories to restore all your Categories. Then you can return to the same options to select Append Items to restore all your Items. If you would like to simulate how backup works, you may perform the following steps: 1. Backup all of your data. Ensure that you have received the e-Mail in your inbox and that you can access the information; particularly the e-Mail with the subject line db_Items for this exercise. 2. Simulate data loss. Tap on the top the My DataBank button on the top-left and select Import, Delete, Delete All Items. 3. Confirm that your Items have been deleted. Go to the Items List screen and check to see that all the items are gone. 4. Restore all your Items. Return to the Category List screen and tap on the My DataBank button on the top-left and select Append Items to restore all your Items. 5. Confirm that your Items have all been restored. Return to the Items List screen and check to see that the items have all been restored. Note: During an actual data loss event, you will need to re-install My DataBank to your device. New installations will always generate the default categories. Delete the default categories (perform Step 2 above) first before restoring your backup data to avoid the SQL Field Constraints error. | |||||||||||||||||||||||||
By entering the URL to an image (JPG, PNG, GIF) for any of the Text fields whether the file resides on the Internet or chosen locally from your device, My DataBank will display the image and resize the photo accordingly. 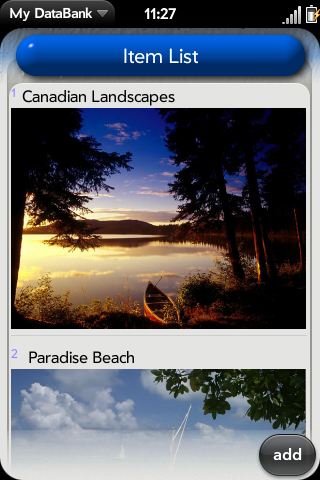 Images are recognized and displayed from the Item List screen and the Item Detail Screen. Images are recognized and displayed from the Item List screen and the Item Detail Screen. | |||||||||||||||||||||||||
If an e-mail address value field is used as the Item List Include from the Category Setup screen, My DataBank can forward the e-mail addresses to the e-mail App allowing you to send everyone in the Item List screen the same e-mail message instantly. 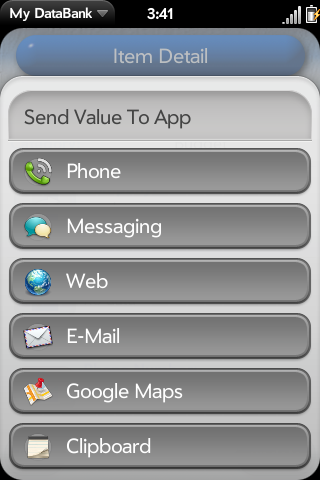 The same steps for group e-mailing can be applied to group SMS or texting. Simply send your mobile values to the Messeging App. The same steps for group e-mailing can be applied to group SMS or texting. Simply send your mobile values to the Messeging App. | |||||||||||||||||||||||||
If a URL value field is used as the Item List Include from the Category Setup screen, My DataBank can launch all of your websites instantly allowing you to view your favorite websites without manually launching each individual URL. 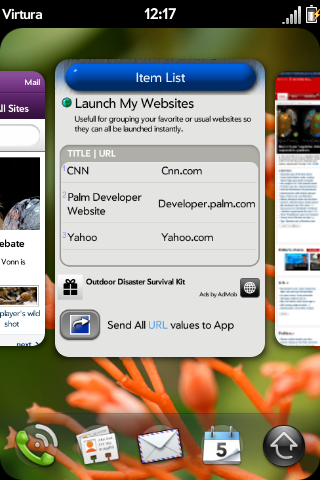 Note: Monitor and limit the number of URLs launched depending on the memory capacity of your device. For example, the Palm Pre Plus can launch more web browsers than the Palm Pre. | |||||||||||||||||||||||||
Interested in sharing your custom Categories with other users? This feature allows you to upload your custom Categories and download Categories other users have created. Sharing Categories can be very helpful compared to reinventing the wheel. From the Category List screen, press on the top-left menu pull down. Then select Share Categories to view and share your Categories. 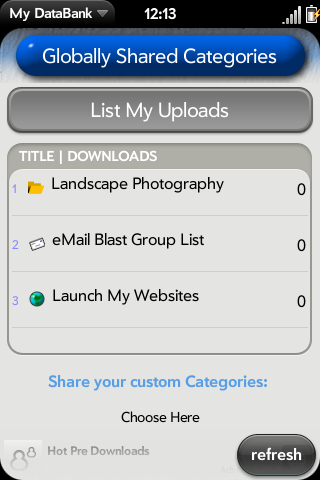 Note: An active signal with Internet connectivity is required. | |||||||||||||||||||||||||
Finding items that meet a specific criteria from the Item List screen can be performed by pressing on the Search button. This give users the flexibility to query for a list of items based on certain conditions. 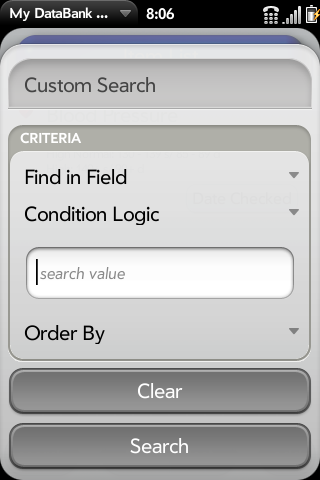 3 parameters are required while the 4th parameter for sorting is optional. 3 parameters are required while the 4th parameter for sorting is optional.The Clear button can be pressed to clear the values for custom searching and return the query item list back to normal. Note: Date field comparisons will work properly when the following date syntax is used: mm/dd/yyyy hh:mm am/pm Where mm represents the month, dd, the day, yyyy the year, hh the hour, mm the minute, and am or pm for the meridian. | |||||||||||||||||||||||||
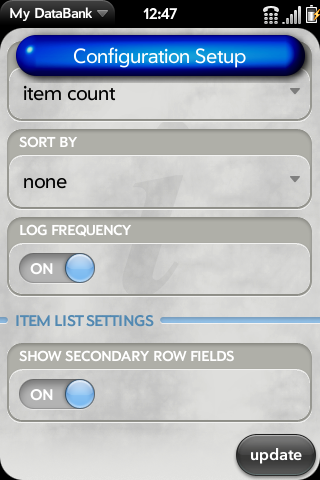
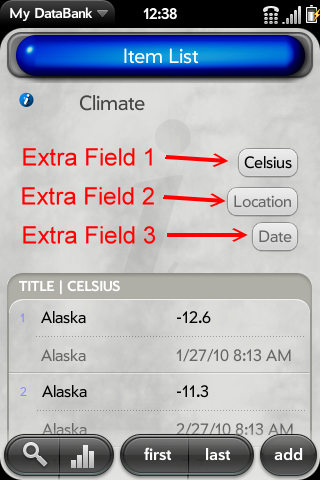
Instant information is what My DataBank is all about and although the Item List screen can display the title of an item and one desired field, in some circumstances it can be inconvenient. To enable a second row which can display an additional 2 fields from the Item List screen, the option must be turned on from the Setup screen.  From the Category List screen, press on the Setup button. Then scroll down until you reach the option, Show Secondary Row Fields. From the Category List screen, press on the Setup button. Then scroll down until you reach the option, Show Secondary Row Fields.
| |||||||||||||||||||||||||
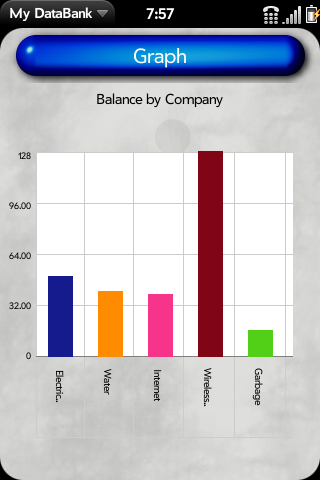
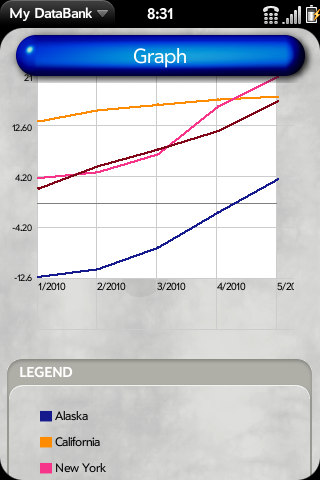
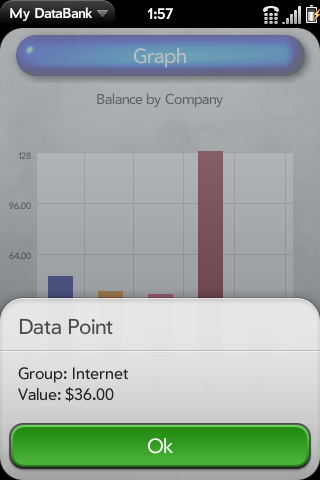
Some information can be more meaningful when displayed visually as a graph. My DataBank now supports column and line graph rendering with horizontal scrolling. Once the sorting and extra fields have been configured properly, the graph button from the Item List screen can be used to render your data in graph format instantly.
| |||||||||||||||||||||||||
Here are the requirements to produce a Column graph:
Here are the requirements to produce a Line graph:
| |||||||||||||||||||||||||
The free version and the unlimited version operate on different application environments. To transfer your existing data from the free version to your unlimited version you will need to export or back up all your data from the free version then import your backed-up data into the unlimited version.  Before importing the data into the unlimited version, you will need to remove the default Categories that are automatically created the first time you launched the unlimited version. This process is similar to the Backup and Restore procedures with the exception of restoring a copy of what you had backed up from the free version. See the Backup and Restore section for more details. | |||||||||||||||||||||||||
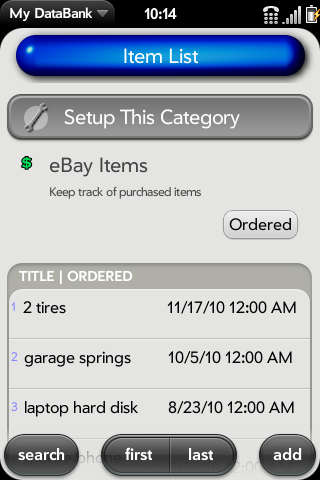
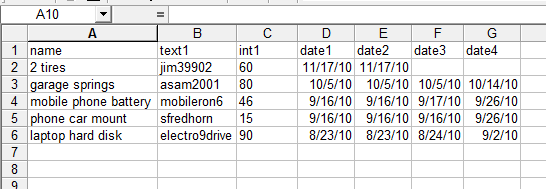
My DataBank uses a proprietary format (MDF) that can be used to send data safely intact across eMail messages. This format can also be converted into CSV format (Comma Separated Format) or Tab Delimited file and vice versa for importing or exporting into and out from popular desktop applications. The following link will bring you to the online conversion tool that can be used to translate your data for importing and exporting with other external applications: CSV to MDF Online Conversion Tool Below is an example of how you can import existing information from an Excel spreadsheet into My DataBank. In this sample, we have a set of information that can be used to help keep track of the trading partners, the cost, and the date of activities made for particular eBay purchases. 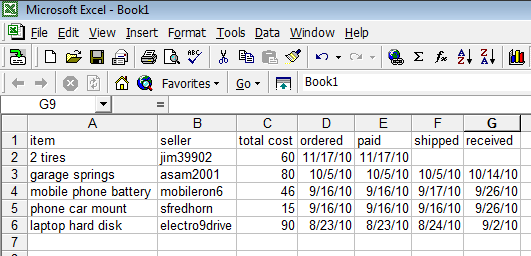 The fields include: item, seller, total cost, date ordered, date paid, date shipped, and date received. The first step is to determine the data types that will need to be used within My DataBank to accommodate these types of information. My DataBank supports the following data types:
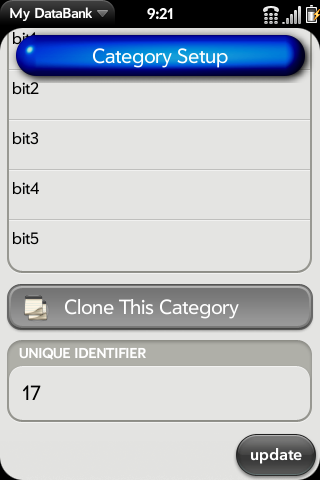
Once determined that they can all be accommodated, creating a new Category to store the information can begin. Below is how each field can be translated into My DataBank: 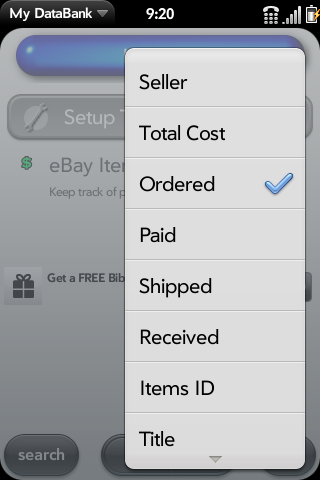
In this case, the Unique Identifier or categorytypeid is 17. Now the fields on the spreadsheet will need to be renamed accordingly. item will now be name, seller will now be text1, total cost will now be int1, and so on and so forth. | |||||||||||||||||||||||||
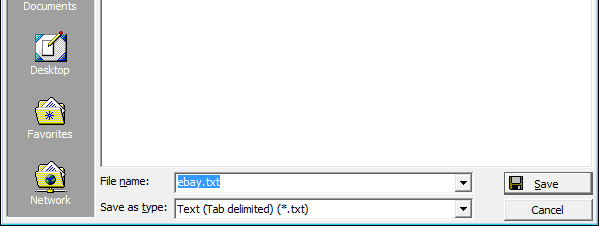
 After all the fields have been renamed, the data can now be saved as a "tab delimited" csv file. | |||||||||||||||||||||||||
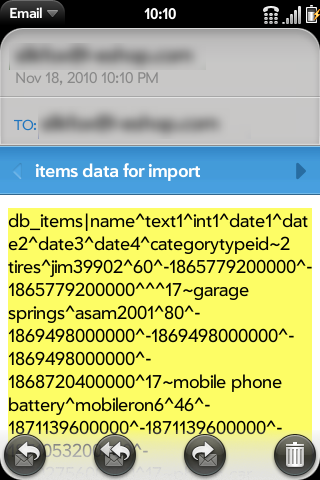
 Notepad or any text editor can be used to view the contents of the tab delimited csv file. After opening, all the data can be selected and copied to the clipboard. 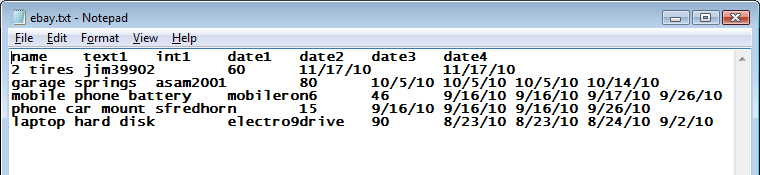 This is where the Online CSV to MDF Converter comes in handy: CSV to MDF Online Conversion Tool By pasting the tab delimited data into the CSV Data Container on the left side, the following 3 settings must be made: 1 Since the data contained in the CSV Data Container is tab delimited, check mark the Tab Delimited checkbox. 2 Provide the correct categorytypeid that will be associated with these items. In this case, it is 17. 3 Select "Items" from the dropdown list as the type of data we are translating are items. 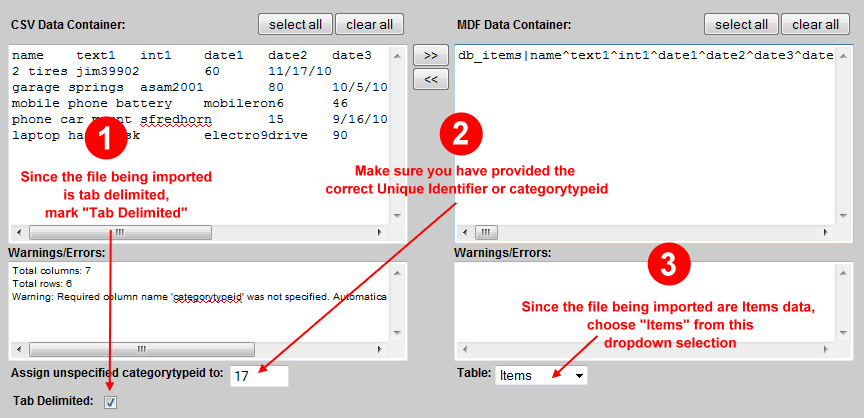 Once everything is set accordingly, the process of conversion can begin by pressing the ">>" button. The equivalent MDF data will instantly appear in the MDF Data Container. The MDF data can now be selected and copied onto an eMail that can be sent to yourself in order to acquire the data to your mobile device.
| |||||||||||||||||||||||||